PCR Lab
Purpose: The purpose of this lab was to discover whether or not our DNA contains the Alu repeat, which is either ++, +-, or -- in all humans' DNA. Scientists have attempted to find the solution to the significance of each possible combination, with no luck. There is no significant difference between people who contain different combinations.
Hypothesis: As mentioned before, we are not sure what it means if the Alu repeat is present. However, I hypothesize that my results for the Alu testing will come out as +-. Not everyone in the class will have the same genome; there will be diversity among us.
Materials: 0.9% saline solution
students' cheek cells
5% chelex
primer mix
master mix (nucleotides, DNA, polymerase, buffer)
TBE buffer
agarose gel, tracking dye
DNA stain, "Gel Red"
positive control DNA
base pair ladder
cups
1.5 mL microfuge tube
microcentifuge
microfuge tube rack
chelex tube
thermal cycler
P-20 micropipette
P-200 micropipette
P-1000 micropipette
refrigerator
small PCR tube
cap locks
gel box
lmop
power supply
gel comb
Procedure:
1. Swirl 10 mL of saline solution in your mouth for 30 seconds.
2. Spit saline into a cup and swish the cup around to mix the cells.
3. Transfer 1000 microliters of the saline solution into a microfuge tube labeled with your initials.
4. Spin your saline cell suspension in a microcentrifuge for one minute to pellet the cells.
5. Observe cell pellet, and pour out the superlatant until there is only about 100 microliters remaining. Be sure not to pour out the pellet.
Results: After completing the PCR lab, I found that I was a -/-
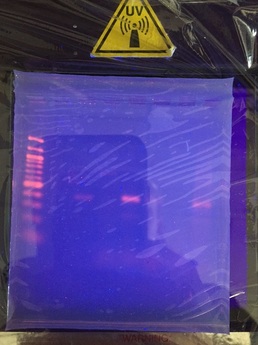
Conclusion/ Analysis: My results were a bit hard to understand. The first time I did this lab, my results were unclear, so I had to do the whole lab over again. I think it could have been even more effective if I had extracted more DNA.
Terrarium Lab
Objective: to create a sustainable ecosystem within a terrarium.
Hypothesis: Can I create a self- sufficient ecosystem without adding anything more than water?
Materials: glass container
soil
plants
earthworms
pebbles
water
decorative mushrooms
clay
moss
sand
plastic container
Procedure:
1. Fill the bottom with sand.
2. Cover the sand with a layer of pebbles.
3. Cover the layer of pebbles with moss.
4. Fill almost to the top with soil.
5. Plant the plants into the soil.
6. Place worms in the terrarium.
7. Water the terrarium daily.
Weekly Log:
Week 1: Biotic changes- no significant growth of plants, worms burrowed deep into soil.
Abiotic changes- change in temperature of the room, change of amount off sunlight coming in through the window
Week 2: Biotic changes- plants dying
Abiotic changes- change in room temperature, location, sunlight
Week 3: no changes
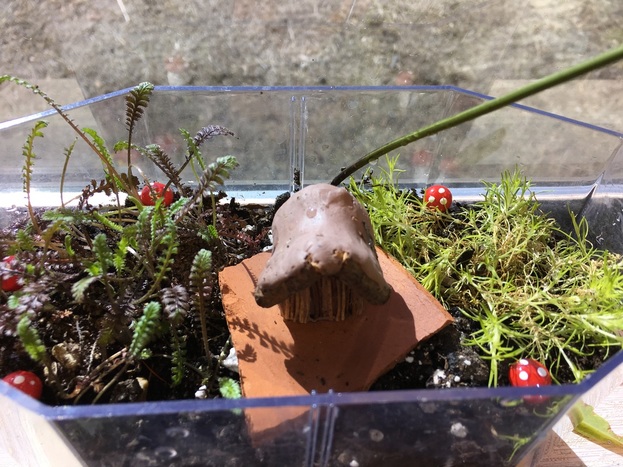
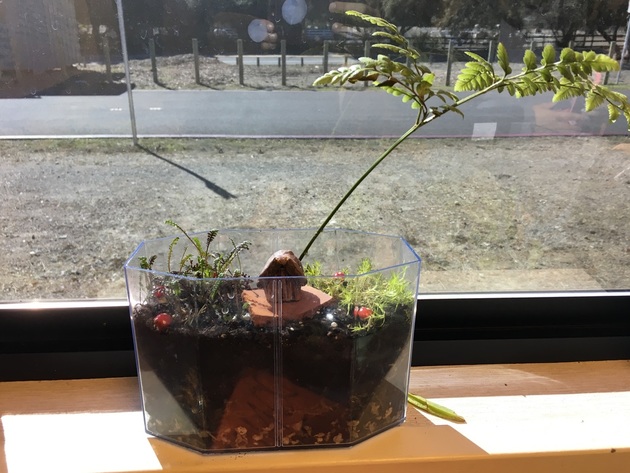
Final Results: There were really no big changes in our terrarium from the time that we planted, other than a slight browning of the plants.
Analysis: Limiting factors, specifically biotic and abiotic factors have negatively and positively affected our terrarium. Water has helped it, but I think that it might of gotten a little too much sunlight. The changing of room temperature might have negatively affected our terrarium. In our terrarium, The nutrient cycle is as follows: we water our plants, which take carbon and nitrogen in from the atmosphere and the soil, and it then respires.
Hypothesis: Can I create a self- sufficient ecosystem without adding anything more than water?
Materials: glass container
soil
plants
earthworms
pebbles
water
decorative mushrooms
clay
moss
sand
plastic container
Procedure:
1. Fill the bottom with sand.
2. Cover the sand with a layer of pebbles.
3. Cover the layer of pebbles with moss.
4. Fill almost to the top with soil.
5. Plant the plants into the soil.
6. Place worms in the terrarium.
7. Water the terrarium daily.
Weekly Log:
Week 1: Biotic changes- no significant growth of plants, worms burrowed deep into soil.
Abiotic changes- change in temperature of the room, change of amount off sunlight coming in through the window
Week 2: Biotic changes- plants dying
Abiotic changes- change in room temperature, location, sunlight
Week 3: no changes
Final Results: There were really no big changes in our terrarium from the time that we planted, other than a slight browning of the plants.
Analysis: Limiting factors, specifically biotic and abiotic factors have negatively and positively affected our terrarium. Water has helped it, but I think that it might of gotten a little too much sunlight. The changing of room temperature might have negatively affected our terrarium. In our terrarium, The nutrient cycle is as follows: we water our plants, which take carbon and nitrogen in from the atmosphere and the soil, and it then respires.
Testing Plant Substances as Potential Medicines
Background: Bio technicians often extract chemicals and materials to be used for synthetic purposes. Not all plants can be successfully used for this purpose.
Purpose: to create a applicable medicine using plant extracts found locally.
Materials:
-balance, weigh boat, lab scoops
-inoculating loop, Ni/Cr wire
-reaction tubes and rack, 1.7 mL
-LB broth base
-petri dishes, 60x15 mm, sterile
-methanol, absolute
-media bottles, 250 mL
-E. coli JM109 (stock plate)
-pipet,
1 mL and pump
-sterilizer, autoclave
-plant specimen -dry
block heater/heat block
-water bath, 37° C, shaking
-mortar and pestle
-forceps, fine-tipped
-laminar flow hood and disinfectant
-pipet, 10 mL and pump
-ampicillin
-glasses, safety, plastic
-plastic funnels, short-stemmed
-glass spreader
-Bunsen burner and gas lighter
-filter paper disks, 5 mm diameter
-incubator over, 37°C
-beakers, 100 mL
-syringe, 10 mL and filter, 0.2 um
Procedure: 1. Prepare a nutrient or LB culture for the E. coli at least 24 hours in advance. Using sterile technique, add a colony of E. coli culture to the broth medium and incubate, shaking at 37 C for 24 hours.
2. Each lab group need 2 petri plates. Draw a "+" on each plate bottom to divide the pate into quadrants (four sections). Label the quadrants No. 1 through 4. Also, label the dish with your initials and the date.
3. Liquefy sterile LB agar in the microwave at 50% power. Using sterile technique, pour approximately 20 mL of sterile, liquid LB agar into each Petri plate. Let the agar solidify for 15 minutes. Let it dry for at least 24 hours.
4. Using a mortar and pestle, grind up 2 g of plant tissue (leaves or bark) with 10 mL of deionized water. Lwt it sit for 3 minutes. Filter and sample through an 11 cm filter paper funnel. Filter sterilize the filtered sample extract using a syringe filter, as demonstrated by the instructor. Collect with 1 mL of extract into a 1.7 mL microtube. Label the sample.
5. Repeat Step 4, but replace the water with methanol as as the extracting solvent. After the methanol extraction, place the 1.7 mL tube with the 1 mL of methanol extract in a 65 C heat block (caps open) for 24 hours or more, if necessary to evaporate the methanol. Reconstitute dry matter in the tube with 1 mL of deionized water.
6. For each of the other samples, repeat steps 4 and 5. Label all samples. There should be six tubes of samples.
7. Using sterile forceps (that have been flamed in alcohol) drop three filter paper disks into each tube of the filtered extract.
8. Prepare negative control disks, three each, of only methanol and only sterile distilled water.
9. Prepare six positive control disks of ampicillin solution.
10. Allow the disks sufficient time to soak up enough extract to be saturated (perhaps overnight).
11. Close the tubes. Store all samples at 4 C until ready to use.
12. Using a sterile pipette transfer 1 mL of the E. coli broth
(made at step 1) to the middle of each Petri dish. Sterilize a spreading loop (using alcohol and a flame) , and evenly spread the bacterial culture around the Petri plate. Quickly cover, and allow the culture to soak into the agar for at least 15 minutes.
13. Using sterile forceps carefully place one disk into the middle of each quadrant, about 2 cm from the outer edge of the Petri dish. Blot any excess liquid before placing the disk on the Petri dish. Keep all the methanol-extracted samples on the same dish and all the water-extracted samples on the same dish.
14. Repeat step 13 twice so that you have three replicates of the methanol extraction and three replicates of the deionized water extractions.
15. Place one of the negative control disks, either sterile distilled water or methanol, in the center of the appropriate plate. Place a positive control disk with ampicillin in another quadrant of each plate.
16. You should end up with six Petri plates, each containing a negative control in the middle, a positive control , and three sample disks. Make sure you have recorded exactly which plant extracts and which solvent went into each quadrant.
17. Make sure the disks are adhering well to the surface of the agar. For incubation, invert the plates and incubate at 37 C for 24 to 48 hours.
18. After incubation, examine the plates with the plant extract disks for zones of inhibition. This is a clear area formed around the disk by the inhibitory action of a substance(s) in the plant material. Photograph or draw the plates, labeling any inhibition of bacterial growth.
19. Create a data table to collect and present data of all the replicates as well as the averages. include descriptions of the bacterial lawn around each disk. Measure and record the diameter and clarity of any cleared areas around the disks. Give quantitative measurements of your observations.
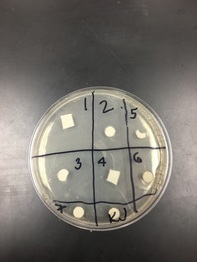
Results:
Our results were inconclusive. We placed different papers in the wrong spot, and so the different chemicals were not balanced. Up until this, our steps were correct.
Purpose: to create a applicable medicine using plant extracts found locally.
Materials:
-balance, weigh boat, lab scoops
-inoculating loop, Ni/Cr wire
-reaction tubes and rack, 1.7 mL
-LB broth base
-petri dishes, 60x15 mm, sterile
-methanol, absolute
-media bottles, 250 mL
-E. coli JM109 (stock plate)
-pipet,
1 mL and pump
-sterilizer, autoclave
-plant specimen -dry
block heater/heat block
-water bath, 37° C, shaking
-mortar and pestle
-forceps, fine-tipped
-laminar flow hood and disinfectant
-pipet, 10 mL and pump
-ampicillin
-glasses, safety, plastic
-plastic funnels, short-stemmed
-glass spreader
-Bunsen burner and gas lighter
-filter paper disks, 5 mm diameter
-incubator over, 37°C
-beakers, 100 mL
-syringe, 10 mL and filter, 0.2 um
Procedure: 1. Prepare a nutrient or LB culture for the E. coli at least 24 hours in advance. Using sterile technique, add a colony of E. coli culture to the broth medium and incubate, shaking at 37 C for 24 hours.
2. Each lab group need 2 petri plates. Draw a "+" on each plate bottom to divide the pate into quadrants (four sections). Label the quadrants No. 1 through 4. Also, label the dish with your initials and the date.
3. Liquefy sterile LB agar in the microwave at 50% power. Using sterile technique, pour approximately 20 mL of sterile, liquid LB agar into each Petri plate. Let the agar solidify for 15 minutes. Let it dry for at least 24 hours.
4. Using a mortar and pestle, grind up 2 g of plant tissue (leaves or bark) with 10 mL of deionized water. Lwt it sit for 3 minutes. Filter and sample through an 11 cm filter paper funnel. Filter sterilize the filtered sample extract using a syringe filter, as demonstrated by the instructor. Collect with 1 mL of extract into a 1.7 mL microtube. Label the sample.
5. Repeat Step 4, but replace the water with methanol as as the extracting solvent. After the methanol extraction, place the 1.7 mL tube with the 1 mL of methanol extract in a 65 C heat block (caps open) for 24 hours or more, if necessary to evaporate the methanol. Reconstitute dry matter in the tube with 1 mL of deionized water.
6. For each of the other samples, repeat steps 4 and 5. Label all samples. There should be six tubes of samples.
7. Using sterile forceps (that have been flamed in alcohol) drop three filter paper disks into each tube of the filtered extract.
8. Prepare negative control disks, three each, of only methanol and only sterile distilled water.
9. Prepare six positive control disks of ampicillin solution.
10. Allow the disks sufficient time to soak up enough extract to be saturated (perhaps overnight).
11. Close the tubes. Store all samples at 4 C until ready to use.
12. Using a sterile pipette transfer 1 mL of the E. coli broth
(made at step 1) to the middle of each Petri dish. Sterilize a spreading loop (using alcohol and a flame) , and evenly spread the bacterial culture around the Petri plate. Quickly cover, and allow the culture to soak into the agar for at least 15 minutes.
13. Using sterile forceps carefully place one disk into the middle of each quadrant, about 2 cm from the outer edge of the Petri dish. Blot any excess liquid before placing the disk on the Petri dish. Keep all the methanol-extracted samples on the same dish and all the water-extracted samples on the same dish.
14. Repeat step 13 twice so that you have three replicates of the methanol extraction and three replicates of the deionized water extractions.
15. Place one of the negative control disks, either sterile distilled water or methanol, in the center of the appropriate plate. Place a positive control disk with ampicillin in another quadrant of each plate.
16. You should end up with six Petri plates, each containing a negative control in the middle, a positive control , and three sample disks. Make sure you have recorded exactly which plant extracts and which solvent went into each quadrant.
17. Make sure the disks are adhering well to the surface of the agar. For incubation, invert the plates and incubate at 37 C for 24 to 48 hours.
18. After incubation, examine the plates with the plant extract disks for zones of inhibition. This is a clear area formed around the disk by the inhibitory action of a substance(s) in the plant material. Photograph or draw the plates, labeling any inhibition of bacterial growth.
19. Create a data table to collect and present data of all the replicates as well as the averages. include descriptions of the bacterial lawn around each disk. Measure and record the diameter and clarity of any cleared areas around the disks. Give quantitative measurements of your observations.
Results:
Our results were inconclusive. We placed different papers in the wrong spot, and so the different chemicals were not balanced. Up until this, our steps were correct.
Elodea Lab
Hypothesis: The more sunlight the tube is exposed to, the less carbonic acid there is (more blue) and the less sunlight the tube is exposed, the higher the carbonic acid levels are.
Materials:
Procedure: We got six tubes of eldea. The first tube was the control which only had bromothymol blue and no elodea. The five tubes had a piece of elodea and bromothymol blue which we blew into, raising the carbonic acid levels. We labeled each tube: direct sunlight, direct classroom light, window light, complete darkness, and outside shade. After that we put the tubes in a tube rack and put them in the places indicated on the tube.
Results:
Control: Same color as bromothymol blue without carbonic acid
Direct Sunlight: Blue
Direct Classroom light: Blue
Window Light: Green, almost clear
Complete darkness: green almost clear
Outside shade: green, almost clear
Analysis: The tubes that got more sunlight were more blue which meant that they used more of the carbon dioxide to photosynthesize, turning it more blue. The tubes that got less sunlight photosynthesized less which means they used less carbon dioxide, leaving more carbon levels higher. This means that our hypothesis was correct.
Materials:
- Bromothymol blue
- Six tubes
- Six tube racks
- Elodea
- Straw
Procedure: We got six tubes of eldea. The first tube was the control which only had bromothymol blue and no elodea. The five tubes had a piece of elodea and bromothymol blue which we blew into, raising the carbonic acid levels. We labeled each tube: direct sunlight, direct classroom light, window light, complete darkness, and outside shade. After that we put the tubes in a tube rack and put them in the places indicated on the tube.
Results:
Control: Same color as bromothymol blue without carbonic acid
Direct Sunlight: Blue
Direct Classroom light: Blue
Window Light: Green, almost clear
Complete darkness: green almost clear
Outside shade: green, almost clear
Analysis: The tubes that got more sunlight were more blue which meant that they used more of the carbon dioxide to photosynthesize, turning it more blue. The tubes that got less sunlight photosynthesized less which means they used less carbon dioxide, leaving more carbon levels higher. This means that our hypothesis was correct.
